Christmas Decorations Centerpiece
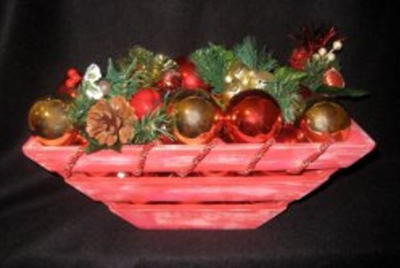
Reinvent old wood into a chic part of your Christmas home decor by making a Christmas Decorations Centerpiece. Instead of replacing your Christmas decorations every year, you can use them in a new way by making them part of a centerpiece that will have all eyes on your Christmas table. There are many design options, which makes this homemade Christmas decoration project the perfect opportunity for you to show off your designer skills.


Materials:
- unfinished wooden crate
- red acrylic paint (Santa Red was used in the video)
- yellow acrylic paint (Country French Yellow was used in the video)
- foam brush
- dry brush
- ornaments or wine corks
- Christmas picks
Optional:
- sandpaper
- hot glue gun and hot glue stick
- craft trim ribbon
Instructions:
- Before you start, lightly sand the crate with sandpaper to smooth out any rough edges. Wipe clean with a soft cloth
- Using your foam brush, paint entire crate with red acrylic paint
- Allow paint to dry completely
-
Using the dry brushing technique, add small amounts of yellow paint to give a slight distressed look. Allow to dry completely
(Optional: Add decorative craft trim ribbon to the crate using your hot glue gun) - Fill crate with ornaments
- Add Christmas picks as needed for additional decoration
-
Display proudly in your home
How to Make a Christmas Decorations Centerpiece:
Find more projects and tutorials from Craft Designer Caroline Dunn.
Your Recently Viewed Projects
SissieSass
Aug 31, 2018
I guess if you had no wine corks, you could always used wadded up paper or shredded paper to make the bed that the ornaments sit on, right? I would love to make a basket like this for my holiday table. I have a ton of leftover ornaments every year that I always want to do something with but I never know what. Now I do.
Report Inappropriate Comment
Are you sure you would like to report this comment? It will be flagged for our moderators to take action.
Thank you for taking the time to improve the content on our site.

