How to Make a Christmas Mini Album
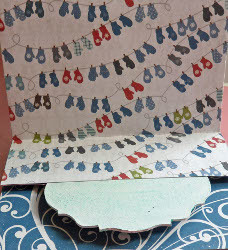
Homemade Christmas gifts are a meaningful alternative to store-bought items. Not sure what to create? Learn how to make a Christmas mini album from Carlene Eshelman and give one to a special person in your life. There's no cutting required for this easy project!

Materials:
- 12 6”x6” scrapbook papers
- Liquid or tape adhesive
- Score board or bone tool/ruler
Instructions:
- Arrange papers in the order that you want them. You will be placing the first page down facing up, then flipping it over.
- Place the second paper face up on top of the first page. Continue until all pages are in order.
- Face pile of pages with first page face up.
- Score 2” on the bottom of the page.
- For second page, score 2” from the top of the page.
- Continue scoring 2” using bottom,top,bottom,top pattern until you are done.
- Glue pages together. Match 2” bottom flap to 2” top flap and glue for the first two pages.
- For page 2 and 3, match 4” flaps together then glue whole pages together. Continue in this same pattern for the rest of the book.
- Optional— to add more space in your book, glue chipboard shapes into the 2” flap areas. You will sandwich the chipboard in between the 2” flaps and adhere.

How to Make a Christmas Mini Album Part 1:
How to Make a Christmas Mini Album Part 1:
For a step-by-step tutorial on how to create a cover for your album, check out Christmas Mini Album Cover.
Read NextEasy Sew Tote

