Santa Pants Wine Bag
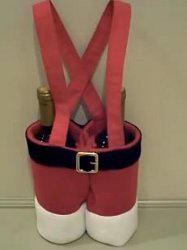
Make a huge impression at your next Christmas party. Christmas sewing craft ideas don't get much more creative than this Santa Pants Wine Bag. Use red and white fleece for this fun hostess gift. It's a great way to show your appreciation! Since most people bring wine to holiday parties, up your game by housing the bottles in this creative and hilarious way. Your party hosts will get a huge kick out of this gift wrapping idea. Using this wine bag also helps protect the wine bottles in transport. Win-win!
Materials:
- 1/3 yard red fleece
- 1/4 yard white fleece
- 1/4 yard red cotton fabric
- Decorative buckle (1 to 1.5”)
- Black velvet ribbon (1 to 1.5” in width & 20” in length)
- Double-sided adhesive tape (found in the notions section of your sewing store)
Tools:
- Sewing machine
- White sewing machine thread
- Red sewing machine thread
- Measuring elements
- Chalk or fabric marker
- Scissors
- Pins
- Iron & ironing board
Instructions:
- Cut fabric as follows: Santa Pant Legs - Cut 2 rectangles of red fleece 12.5” X 10”, Wine Bottle Holder bottom - Cut 2 circular pieces of red fleece 4” diameter, Santa Pant Cuffs - Cut 2 rectangles of white fleece 3” X 12.5”, Santa suspenders/wine bottle handles - Cut 2 rectangles of red cotton fabric 4” X 23” Start with the pant legs. Thread your sewing machine with white thread.
- Pin white cuffs 1/2 inch above the bottom of each red fleece rectangle. 12.5” sides should be on the same side.
- Top stitch white fleece in place. Repeat for the other piece.
- Change thread in sewing machine to red thread.
- Turn over the red fleece, fold down opposite end (from white cuff) down 1.25 inches.
- Top stitch in place. You should now have a red rectangular fleece that is 8.75” X 12.5”.
- Holding the right sides together, sew the sides that are now 8.75” long with a 1/2” seam allowance together. This forms your Santa pant legs.
- Sew the bottom. With right sides together, pin in place the circular bottom fabric to the bottom of the wine bottle cover. Sew in place with a 1/2” seam allowance. Turn inside out so that the right side is now visible.
- Repeat steps 6 thru 9 for the other “pant leg.”
- With both “pant legs” right-side out, line up the seams and stitch 1” from each seam and 1” in depth to attach the 2 pant legs together.
- Hand sew the “crotch” area for a more pant-like look.
- Next, we will work on “Santa’s suspenders” / wine bag handles. Take each 4” X 23” red cotton fabric piece and fold in half lengthwise wrong sides together. Press with your iron. Open up the fabric.
- Option: Add interfacing to stiffen the handles.
- Fold each long edge in toward the center and press. Then fold the fabric in half again at the center crease enclosing the raw edges and press.
- Edge stitch along the long edges. Repeat for the other handle.
- Finish short ends with a zig zag stitch.
- Pin handles with the zig zag edge 1” below the top of the wine bag crossing the handles over in the middle. The handle that starts in the front of the left leg should end on the back of the right leg and vice versa.
- Sew handles in place.
- Last, we will attach Santa’s belt. You should be able to thread the velvet ribbon through the belt buckle. Cut velvet ribbon to 20” in length.
- Create a small hole in the center (length and width) of the velvet ribbon. This is for the post of the belt buckle.
- Thread the belt buckle to the middle of the ribbon and secure the post through the small hole you made in the previous step.
- Attach one side of the double-sided adhesive to the wrong side of the ribbon with the belt buckle.
- Attach the other side of the double-sided adhesive around the top edge of the wine bag starting with positioning the belt buckle in the front, center, and top of the wine bag.
- Optional, sew belt into place.
How to Make a Santa Pants Wine Bag:
Find more projects and tutorials from Craft Designer Caroline Dunn.
Read NextNoel Wine Cozy

