Cookies for Santa Jar
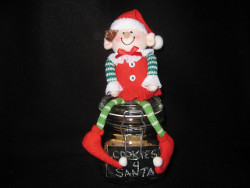
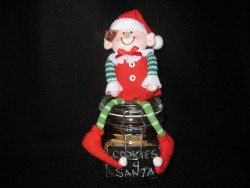
Santa will be in for a sweet surprise when he sees this Cookies for Santa Jar. This tutorial shows you how to create a fun little Christmas jar craft that you can put out a part of your Christmas home decor. Guests will love the cute little details, and can also enjoy whatever treats you put inside. Making a DIY Christmas decoration like this is an easy way to keep Christmas spending down while still adding something special to your collection of Christmas decorations.
Materials:
- Small glass jar with lid
- Chalkboard paint
- Foam brush
- Small elf toy
- Masking tape or painters tape
- Scissors
- Hot glue gun and glue stick
- Chalk
- Optional: Primer paint
Instructions:
- Using your masking tape, mask off a rectangular portion of the front of your jar
- Optional: Paint 1 coat of primer paint and allow to dry for 2 hours
- Using your chalkboard paint and foam brush, paint the area inside the masking tape
- Allow to dry completely, 1 hour or longer
- Repeat for 2 more coats
- Allow to dry completely, 24 hours or longer
- Rub chalk over entire chalkboard surface
- Wash off with water and dry with a paper towel
- Using your hot glue gun, attach body of elf toy to the lid of the jar
- Using your chalk, write “Cookies 4 Santa” on the chalkboard portion of the jar
- Fill with cookies and wait for Santa to arrive
Make a Cookies for Santa Jar:
Read NextOlaf from Frozen Crochet Pattern
Your Recently Viewed Projects
SissieSass
Oct 31, 2018
How else can Santa keep his cookies fresh? This is such a wonderful idea for gift giving and decorating. I think that people will adore getting these jars as a holiday gift. People have their favorite holiday treat. I can use those to fill the jars and make all the jars the same to save time.
Report Inappropriate Comment
Are you sure you would like to report this comment? It will be flagged for our moderators to take action.
Thank you for taking the time to improve the content on our site.

