Snowman Christmas Countdown Magnet Board
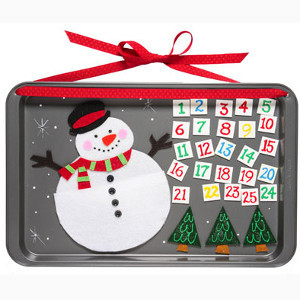
Nothing is more exciting for kids than anticipating the Christmas holiday. With this adorable Snowman Christmas Countdown Magnet Board, they can efficiently count down the days until Christmas. This DIY snowman decoration is really practical; it helps kids practice counting and gives them some ownership of the decor, since they can easily remove the magnets. You can also keep the magnet board up after Christmas as an adorable snowman decoration. Use the number magnets to hold up Christmas cards or winter activity lists. Snowman Christmas crafts add such delight to any room they are in, and this colorful snowman craft is no exception. Plus, these magnet boards made out of cookie sheets are easy to hang, so you can do your countdown in any part of the house.

Materials:
- Tulip® Dimensional Fabric Paint Black
- Tulip® Dimensional Fabric Paint Crab Apple
- Tulip® Dimensional Fabric Paint True Blue
- Tulip® Dimensional Fabric Paint Yellow
- Tulip® Fabric Spray Paint Sparkling Star
- Aleene's® Original Tacky Glue®
- Tulip Soft® Fabric Paint Glacier White
- Hammer
- Peel and stick magnet strips
- Gem stones, clear
- Paper towels
- Clothespins
- Felt squares, red, lime, dark green, pink, orange, tan or brown, black
- Buttons, ½” diameter, 3, black
- Stiff felt, 12”x18”, white
- Foam paintbrush, 1” wide
- Metal cookie sheet, 12”x19”
- Pencil
- Wood tiles, 1” square, 25
- Ribbon
- Paintbrush, liner
- Large nail
- Scissors
- Pattern
Instructions:
-
Cut out snowman pattern. Lay pattern onto stiff felt. Lightly trace around pattern. Cut out. Cut out two snowmen and two pocket sections.
-
Trace remaining components of snowman and trees onto appropriate color of felt. Cut out.
-
Glue a hand at each side of body, using Original Tacky Glue. Apply a fine line of glue around edges of one snowman body. Lay second snowman body onto wet glue, matching edges. Secure with clothespins until dry. Remove clothespins.
-
Glue hatband to hat and scarf around neck. Glue carrot nose and pink cheeks into place. Glue stripes onto scarf.
-
Shake bottles of paint well. Start flow of 3D Paint on a paper towel, applying an even pressure on bottle for a smooth line.
-
Make small dots for eyes and mouth, using Slick Black. Let dry.
-
Glue buttons down center of pocket piece. Or, you can make a small dot of Slick Black and press button into wet paint to adhere.
-
Glue pocket onto lower part of snowman’s body, matching edges. Secure with clothespins until dry. Remove clothespins.
-
Apply two coats of Matte Glacier White to wood tiles, using foam brush. Let dry after each coat.
-
Write numbers onto tiles, using desired colors of 3D paint. Let dry thoroughly.
-
Glue a tree top to each trunk. Add design onto each tree top, using Slick Crab Apple. Let dry thoroughly.
-
Apply Glitter Spray to trees and to snowman, following instructions on label.
-
Cut magnet strips to fit backs numbers and trees. Remove protective backing from magnets. Attach to back of numbers and trees.
-
Punch holes at upper corners of cookie sheet, using hammer and nail. String ribbon through holes. Tie a bow at top for hanger.
-
Glue snowman to cookie sheet. Arrange magnetized numbers and trees as desired.
- Dip end of liner brush handle into Matte Glacier White. Make a random pattern of dots to look like snow. Paint star bursts. Glue a gem into center of each starburst.
Read NextCute Yarn Snowman Decoration
Your Recently Viewed Projects
ashleroo
Nov 12, 2017
This is such a cute little advent calendar! I know that you can get most of these supplies from the dollar store, so it would be super affordable to make. I was thinking that it would also be fun to make the numbers on those fun pre-cut foam shapes that you can get in the seasonal aisle at the dollar store (like snowflakes, Santa hats, etc.) I really think that this would be fun to use in the classroom not just for an advent countdown, but for number sequencing at a math station with wee-ones in a kindie class. This is super cute.
Report Inappropriate Comment
Are you sure you would like to report this comment? It will be flagged for our moderators to take action.
Thank you for taking the time to improve the content on our site.

