Christmas Cork Tree
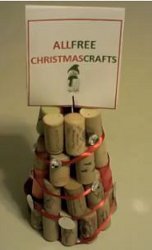
Christmas and wine - what could go wrong? Enjoy your favorite drink throughout the year and create cork crafts for Christmas! Place Christmas Cork Tree on your mantel and add a paper clip on top to turn it into a fun photo holder!
Materials:
- Approximately 35 wine corks
- Green Styrofoam Cone (2-7/8 in. X 5-7/8 in.)
- Ribbon
- Embellishments
- Paper clip
- Hot glue gun & glue sticks
Instructions:
-
Group your wine corks by height. For a consistent look, wine corks of equal size will be used per row. Plug-in (warm-up) your hot glue gun.
-
The project in the video has 4 rows of wine corks. The number of corks per row are as follows. Row 1 is the bottom row and Row 4 is the top of the tree. Row 1: 12 corks, Row 2: 9 corks, Row 3: 7 corks, Row 4: 6 corks.
-
Using your hot glue gun, attach the wine corks lengthwise forming the bottom row of corks around the widest part of the cone. I used 12 corks for the bottom row of the tree.
-
Repeat attaching wine corks lengthwise for the 2nd row of the tree, immediately above the first row of corks. I used 9 corks for this row.
-
Repeat for the 3rd and 4th rows of the cork tree. I used 7 corks for the 3rd row and 6 corks for the 4th row (top row).
-
Decorate the tree. I used narrow red ribbon as garland and sparkle embellishments for lights.
-
Taking your paperclip, bend the outermost wire straight to form a stake for your picture card holder. Insert paperclip wire into the top of the tree and finish with your favorite picture, card, or placecard.
- Optional: Instead of using a paperclip, use an alligator clip as your tree topper/picture card holder. OR If you have a lot more wine corks, consider a taller / larger cone for a stunning and unique centerpiece for your Christmas dinner table.
How to Make a Christmas Cork Tree:
Find more projects and tutorials from Craft Designer Caroline Dunn.

