Glorious Glitter Gift Boxes
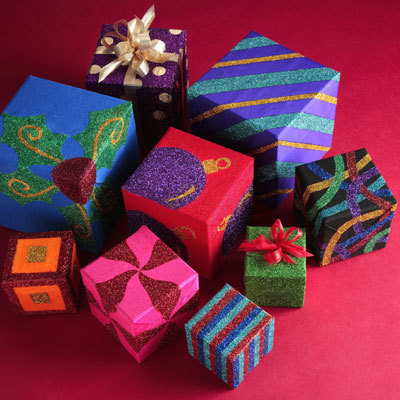
A lot of attention goes into picking out the perfect Christmas gift; put as much effort into your DIY gift boxes this year with these Glorious Glitter Gift Boxes. Making homemade Christmas gift boxes shows that you are putting a lot of careful thought into your holiday gifts, but sometimes it is difficult to come up with new gift wrapping ideas. This tutorial show you how to make a gift box, and also how to use different color fabric and glitter to create several DIY christmas gift boxes and make your gifts as unique as their recipients this season.

Materials:
Aleene's® Fabric Fusion® Permanent Fabric Adhesive
Tulip® Fashion Glitter® Turquoise Jewel
Aleene's® Crystal Clear Acid Free Tacky Spray™
Tulip® Fashion Glitter® Bond
Brushes: ½” flat, small round
Foil
Ribbon, colors to match
Gift boxes
Scratch paper
Sticker dots
Newspaper
Scissors
Low tack masking tape: 1”, ¼” wide
White chalk pencil
Fabrics: royal blue, gold lame, black, red, fuchsia
Pattern
Basic Glitter Instructions:
- Squeeze a puddle of Glitter Bond onto foil.
- Use brush to apply an even coat of Glitter Bond where desired or within pattern. Immediately sprinkle Glitter over glue then tap off excess onto scratch paper.
- If possible, finish one color before starting another.
- Work in small sections or on one side at a time.
- Once thoroughly dry, use a stiff brush to brush off excess loose glitter.
- Let bottom layer of glitter dry before layering a second color.
- Any excess glitter can be re-used, just pour back into jar.
Covering Box Instructions:
- Cut fabric to fit around sides and of bottom of box adding a few inches on all sides. NOTE: If fabric is too thick, the lid may not close if totally covered. Check each fabric, if it does not fit, fabric may have to be placed just up to edge where lid and box meet.
- Lay fabric, right side down, on a sheet of newspaper. Following Tacky Spray instructions, spray an even coat on back of fabric.
- Carefully lift fabric and place on box, pressing and smoothing onto box leaving about a 1” overlap at ends, using scissors as needed to trim excess fabric. Fold fabric to bottom of box and wrap like a present.
- Use Fabric Fusion as needed to glue down inside folds, etc. Use small pieces of low tack masking tape as needed to hold in place until dry.
- Repeat steps for lid.
Green Box Instructions:
- Glitter is applied directly to box.
- Brush an even coat of Glitter Bond on one side of box. Sprinkle on Glitter and tap off excess.
- Continue with remainder of box and lid. Let dry.
- If needed, apply more Glitter Bond and Glitter to cover any design on box that may show through. Let dry.
- Tie ribbon around box.
Royal Blue Stripe Box Instructions:
- Cover box with royal blue fabric, using Tacky Spray.
- Place lid on box.
- Place a strip of 1” wide low tack masking tape on box, starting at a lower corner, applying diagonally across lid then down other side. Add another strip the width of tape apart, then another about ¼” from it repeating design across remainder of box.
- Run a fingernail along edges to prevent seepage.
- Use brush to apply Glitter Bond to one stripe at a time. Sprinkle Turquoise on wide stripes and Gold on thinner. Let dry. Remove tape.
Purple with Dots Box Instructions:
- Cover box with gold lame fabric, using Tacky Spray.
- Press sticker dots where desired on box. Run fingernail around edges to prevent seepage.
- Working on one side of box at a time, apply a thin, even coat of Glitter Bond then sprinkle on Purple Glitter. Let dry.
- Remove sticker dots.
- Tie gold ribbon around box.
Small Multi-color Striped Box Instructions:
- Glitter is applied directly to box.
- Press a strip of ¼” wide tape along bottom on one side, across top and down other side. Apply another piece right next to it. Remove first strip of tape.
- Use small round brush to apply a thin, even coat of Glitter Bond along edge of box next to tape. Sprinkle on Turquoise Glitter then tap off excess on paper. Have a piece of scratch paper for each glitter color.
- Remove strip of tape then apply another ¼” from glittered stripe. Apply Glitter Bond in stripe, apply Red Glitter, tap off excess then remove tape. Repeat steps across remainder of box creating stripes of Turquoise, Red and Royal Blue.
- Repeat step for last side. Let dry.
Fuchsia Box Instructions:
- Cover box with fuchsia fabric, using Tacky Spray.
- Trace and cut four patterns, enlarging or adjusting to fit box.
- Place pattern on top of lid, touching tips in center, holding in place with a loop of masking tape on backs.
- Use white chalk pencil to lightly trace along edges of pattern. Remove patterns.
- Use flat brush to apply Glitter Bond to alternating areas then sprinkle on Red Glitter. Tap off excess.
- Repeat steps for sides making sure design matches at edges of lid.
Ornament Box Instructions:
- Use white chalk pencil to trace pattern at corners.
- Use flat brush to apply Glitter Bond to ornament then sprinkle on Purple Glitter. Let dry.
- Use small round brush to fill in hanger and highlight. Sprinkle on Gold Glitter.
Swirly Stripes Box Instructions:
- Use white chalk pencil to lightly trace crisscrossing lines around box.
- Use flat brush to apply Glitter Bond to one stripe.
- Apply Glitter to stripe, tap off then continue with remainder of stripes.
Read NextSmall Gift Box and Flower Bow
Your Recently Viewed Projects
Hannah
Jul 03, 2017
I make similar boxes every year. I'm glad I can make more boxes with different designs and patterns. Some boxes I place under my tree, and some I give as a gift. Very easy and cost effective!
Report Inappropriate Comment
Are you sure you would like to report this comment? It will be flagged for our moderators to take action.
Thank you for taking the time to improve the content on our site.

