Dazzling Decoupage Holiday Tree
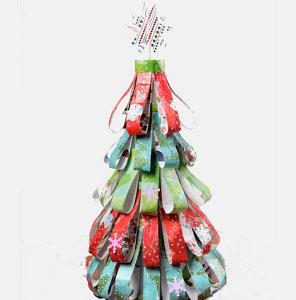
Show some holiday spirit this year with this Dazzling Decoupage Holiday Tree. This tutorial shows you how to make a homemade Christmas Tree by applying decoupage to festive paper and gluing the paper in fun loops to a foam cone. If you are looking for DIY Christmas decor, this tabletop tree with its multicolored branches is an adorable addition. You can also use different paper and make a variety of these trees for any room. The trees will be a simple, yet unique addition to your homemade Christmas decor.

Materials:
- Collage Pauge® Instant Decoupage™
- Aleene's® Original Tacky Glue®
- Sequins, snowflake
- Freezer paper
- Foam cone
- 12” x 12” paper: Christmas prints - 2 red, 2 lime and 2 turquoise
- Scissors
- Masking tape
- Paintbrush, large
- Wire
- Pencil
- Paper cutter
- Foil
Instructions:
-
Cut all papers into quarters.
-
Squeeze a puddle of Aleene’s® Collage Pauge™ Instant Decoupage™ onto a small piece of freezer paper. Tape a large piece of freezer paper at corners onto work surface, shiny side up. Brush Collage Pauge™ onto a section of freezer paper slightly larger than one of the cut pieces of paper. Choose one of the colors of Christmas paper and smooth onto glue.
-
Continue adding Collage Pauge™ to section of freezer paper next to the printed paper you just applied and slightly onto the paper. Add another piece of same color of paper onto Collage Pauge™, slightly overlapping onto other paper. Brush Collage Pauge™ on top of papers. You will have a collage of the same color/print of paper that is slightly smaller than the original 12” x 12” sheet you began with.
-
Repeat steps 2 and 3 for each color/print of paper. You should have a total of 6 collaged papers.
-
Let dry overnight.
-
Peel collaged papers from freezer paper. Cut around edges to straighten.
-
Using paper cutter, cut 1” wide strips from each collaged paper.
-
To form tree loops, squeeze Aleene’s® Original Tacky Glue™ onto the back of a strip at the top. Fold the bottom end of strip back and press into glue. Refer to photo. Repeat with for all strips except one, which will be placed around the top of the tree. Let strips dry.
-
To create the tree “leaves,” first choose the color of loops of your choice and apply some Original Tacky Glue™ onto the portion of paper loops where the ends meet. Starting at bottom of cone, one at a time, press loop in place with looped end extending downward from bottom of tree, using bits of masking tape to hold in place. Repeat all the way around the bottom of cone.
-
Repeat process for each layer, alternating colors. Refer to photo. Let dry. Glue un-looped strip of paper around top of tree.
-
Glue snowflakes randomly all over tree, by first squeezing a dot of glue on back of a snowflake sequin. Press in place on a loop. Repeat process for all snowflakes.
- Freehand draw a star on white paper or matching printed paper using a pencil. Cut out two. Glue back to back (refer to photo) with wire in between. Press wire into top of tree.
Read NextVintage Thread Spool Tabletop Trees
Your Recently Viewed Projects
SissieSass
Nov 26, 2018
What a wonderful Christmas tree design. Do you use the paper in other ways to create designs besides trees? I bet an angel craft made this way would be super cute. If you have something for that idea, I would love to see it. My mom loves angels, and I could surprise her with a super cute one this year.
Report Inappropriate Comment
Are you sure you would like to report this comment? It will be flagged for our moderators to take action.
Thank you for taking the time to improve the content on our site.

