Log Slice Gift Tag
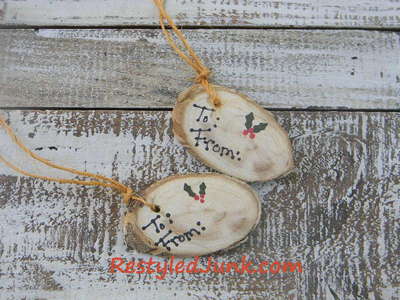
Clean up the fallen branches in your backyard and recycle them into something useful. Make unique gift tags from sliced branches. The Log Slice Gift Tag will definitely be something your friends and family will want to keep and display. The tags are excellent for gifts and they make great ornaments or Christmas decorations that can be used for many years to come. Scrap wood projects like this gift tag are great because they save money and they help clean up your yard.
Materials:
- Branch or log
- Pruning shears
- Measuring tape
- Miter saw
- Drill and 5/32-inch bit
- Black permanent marker
- Toothpick
- Household scissors
- Black acrylic paint
- Forest green acrylic paint
- Red acrylic paint
- Baling twine
Instructions:
- Choose a fallen branch from your yard or a kindling log from your wood pile with a diameter of approximately 2 inches. Remove smaller branches from the main branch using pruning shears.
- Set your miter saw at a 45 degree angle to the right side of the center. To protect your fingers while cutting, do not set the angle to the left side of the center.
- Make one cut on the end of the branch to create the first diagonal cut. Discard the tip. Continue to cut diagonal slices approximately 1/4 inch thick. Each slice is a gift tag.
- Using a 5/32-inch drill bit, drill a hole through a sliced tag approximately 1/2 inch from one narrow end. This will be on the left side of the tag where the hanging ties will be attached. Tip: Place the slice on your work surface and position it with the narrow ends to the right and left. The bark will be visible on one end, while the opposite end will taper under the tag. Drill the hole through the end with the visible bark.
- Print "To" and "From" on the same end as the drilled hole using a black permanent marker. Clip the end of a toothpick to broaden the tip using household scissors. Dip the cut tip in black acrylic paint and dot the ends of each letter. Dot a colon (:) at the end of each word. Allow the paint to dry.
- Choose an area on the tag for the holly that will not be in the way of writing names on the tag. Dip the uncut tip of the toothpick in forest green acrylic paint. Draw a right and left parenthesis, in that order, spaced approximately 1/8 inch apart. The parentheses marks should be approximately 1/4 inch tall. Draw arrow tips at the top and bottom of each parenthesis to close the holly leaf. Fill in the holly leaf using more paint and the toothpick tip. Paint another leaf next to the first. Allow the paint to dry.
- Dip the cut tip of the toothpick in red acrylic paint. Dot three holly berries between the two leaves. Allow the paint to dry.
- Cut a 12-inch length of baling twine. Fold the twine in half. Insert the folded end through the hole from the front to the back. Insert the free ends of the twine through the fold of the twine. Pull to tighten the twine against the edge of the tag.

