Log Slice Snowman Ornament
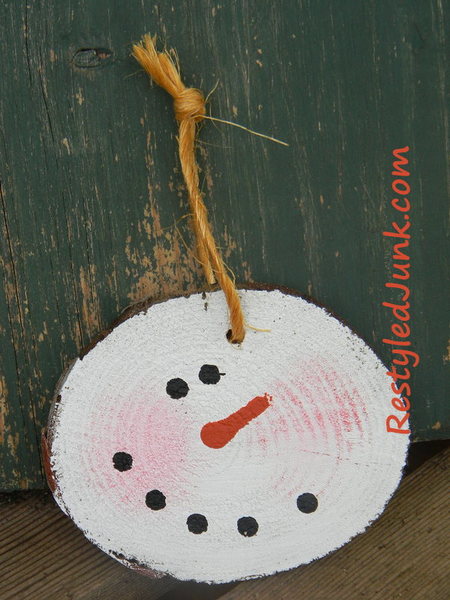
Logs from the wood pile can do more than warm your home. They can also warm the hearts of your friends and family. Slice a log into disks and craft whimsical snowmen ornaments for the Christmas tree. This Log Slice Snowman Ornament is a thrifty and fun decoration for your home at Christmas. Simple wood projects like this homemade ornament make fantastic Christmas crafts for kids. Grab the wood log and just a few other basic supplies to create a cherished ornament for the tree.
Materials:
- Branch or log
- Measuring tape
- Pruning shears or jigsaw
- Chop saw (miter saw)
- Drill and 5/32-inch drill bit
- White acrylic paint
- Paintbrush
- Blush
- Stencil brush
- Wooden skewer
- Black acrylic paint
- Orange acrylic paint
- Baling twine
- Scissors
Instructions:
- Choose a fallen branch from your yard or a log from your wood pile with a diameter of approximately 3 inches. If smaller branches protrude from the log, remove them using pruning shears or a jigsaw.
- Using a chop saw, cut slices from the log approximately 3/8 inch thick. Each slice will be a snowman ornament.
- Using a 5/32-inch drill bit, drill a hole through a log slice approximately 1/2 inch from the edge. This will be the top of the ornament where the hanging loop will be attached.
- Lay the slice on your work surface with the chosen front facing up. Paint the front using white acrylic paint. Allow the paint to dry.
- Apply two 1-inch circle cheeks on the face using blush and a stencil brush. Hold the ornament upside down and tap off the excess.
- Dip the blunt end of a wooden skewer in black acrylic paint. Dot two eyes above the center of the face and spaced approximately 1/8 inch apart. Apply five dots to form the snowman's mouth. I wanted my snowman's face to have a quirky expression, so I applied the eyes and mouth to the left of the center.
- Dip the blunt end of the wood skewer in orange acrylic paint. Apply a dot to the center of the face. Without lifting the skewer, drag the orange dot slightly upward and to the right to form the carrot nose. Allow the paint to dry.
- Cut an 8-inch length of baling twine. Thread the twine through the drilled hole in the ornament. Bring the ends together and tie in an overhand knot to form the hanging loop.
Tips:
- Smaller or larger diameter logs can be used for this project. When choosing a larger log, keep the size of the saw's cuts in mind. You want to be able to cut completely through the log with one motion.
- The bark on some of my slices flaked off. I was sure they would not look good for these ornaments, but I painted them anyway. I was pleasantly surprised by the way they turned out.
Read NextCute Yarn Snowman Decoration
Your Recently Viewed Projects
ashleroo
Nov 10, 2017
What a cute Christmas tutorial! I love how easy and inexpensive this is. I bet that my nephews would love making these as Christmas gifts. I was thinking that you could really give them a vintage look by swapping out the plain white paint for some crackle paint. I think that is would be really cute! I also thought that some lace ribbon would look really pretty and snowy for hanging them up. I can't wait to give this tutorial a whirl!
SissieSass
Dec 09, 2016
Awww, what a really cute idea! I love how you made the snowman blush. I was thinking that you could glue the string to the wood instead of making a hole in the slice. Have you tried any ways of gluing strings to the snowmen? Have you made any other Christmas characters like Santa or reindeer with little twigs as antlers?
Report Inappropriate Comment
Are you sure you would like to report this comment? It will be flagged for our moderators to take action.
Thank you for taking the time to improve the content on our site.

